Creating a Tiny Planet with Ambassador Dave Karrick
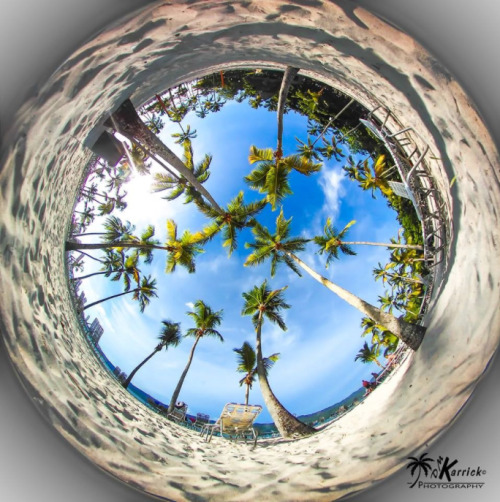
Whenever 360fly Ambassador Dave Karrick is not home in Haines City, Florida, he’s out traveling to exotic locations or getting incredible shots of the Sunshine State. He has perfected the “tiny planet” selfie and his photos have been used in traveling blogs and cruise lines around the world. We asked Dave to tell us how he captures these amazing shots.
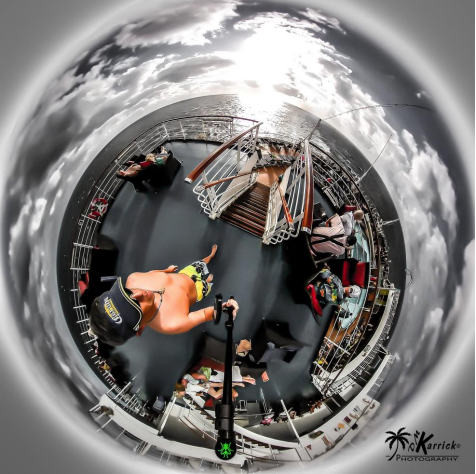
Share your 360° photos just like 360° Fly Ambassador Dave Karrick does!
Dave shares his secret to the perfect tiny planet selfies:
Capturing the Picture or Video:
* I prefer most of the time to video or take pictures with the lens facing downward. This will give me that 360 planet effect for pictures and nice 360 degree surround for videos.
* I plan my shots well in advance before doing any activities.
* I always research how my surroundings will be for the pictures and what the best way will be capture the shots..
* I will also choose a mount specifically for the situation.
* I will take test shots and video beforehand to be prepared and to take less time for set up when on location.
* I will take a picture of the mount for reference later.
* I always have a monopod with a 1/4x20 screw in at the base of the monopod. If I am in or around water I will also use a waterproof monopod. I use a combination with the monopod by adding either a monopod base stand support, a hook, a stake, a suction mount, or a magnet mount. I add to the top of the monopod a combination of aluminum helmet arm extensions to invert the camera 180 degrees so it faces downward.
* I have created a half circle mount using a ½ aluminum bar to point the camera eye straight down at the monopod.
* I purchased an iPhone 5s (got on Craigslist $125) just to use as a remote for all my cameras. I put on a Lifeproof waterproof case (eBay $20), purchased a Lifeproof armband holder (eBay $10).
* I added a ¼ screw to adapt a bicycle clamp to attach to the monopod if I will be holding the monopod.
* Sometimes I will use the armband for ATV or Ziplines.
* If I am on the beach, I will adapt a stake, monopod, and arches and then set it close to where I want to capture the scene. Best practice is to face the arm extensions and monopod straight to a background that is plain or not busy with detail. This will help you Photoshop the fixtures out of the picture more easily when in post-production.
* Also, I use the iPhone as a remote to take the pic or video. After the shooting is over, it’s time to see what cool stuff I have captured in post production!
Importing images into 360fly Director:
All my work is done on an iMac.
Two methods I commonly use to get an image off of the camera when I’ve taken a photo are 1) Go directly into the camera folder and save to your hard drive for editing, and 2) Open up 360fly Director - Click on Camera - Find Image - Click “Import” Image files you want to edit - Go to Images Tab - Find Image - Click on “Save to” - Select Folder you want to save to - Save - . After all images have exported, close 360fly Director.
Importing images from videos into 360fly Director: Open 360fly Director - Click on Camera - Import video files you want to save images from for editing - Go to Videos Tab - Find Video - Click Play - Pause at Location - Click “image” camera icon - Click full 360 degree image - Go to Images Tab - Find Image - Rename image - Click “Save to” - Select Folder you want to save to - Save - . After all images have exported, close 360fly Director.
Editing
I use Adobe Lightroom for my photo editing: Open Lightroom - Go into Library- Click Import - Choose Folder your images are in - Uncheck all - Check ones you want to import - Click “Import” Click on the one to start developing - Click the Develop tab - This is where I make my adjustments. Change the exposure, contrast, set the white balance, decrease the highlights, increase the shadows, adjust whites up and blacks down, adjust the vibrancy up a little, adjust colors as needed, etc. I use Clone or Heal to get out anything I don’t need in the picture. I will zoom in to work on sharpening and use luminance to smooth it out. The last thing I do is I will go into Effect - Post Crop Vignetting - Slide Left for Black round crop out or Right for White round crop out - Adjust midpoint to bring the outer circle in or out - Adjust roundness to a perfect circle if desired - Feather to blur edge/sharpen outer ring - Adjust to your preference to what looks cool. Once I feel that it looks totally awesome, I click on Export. Then I can upload to Facebook, Twitter, Instagram or send to 360fly as a 360 planet view. If you want to upload in 360 degree surround, then add back into 360fly Director and save it from there. Perform the normal procedures to upload it.